There is a list of already made schedules.
Getting pictures with Lazy Boy.
You can use Lazy Boy to get pictures from the internet Via Google Images.
Here are the steps for copying a picture into one of your schedules.
Step 1.
1. Click the camera icon(1)
2. Type bus in the free edit box(2).
3. Click Lazy Boy(3).

Step 2.
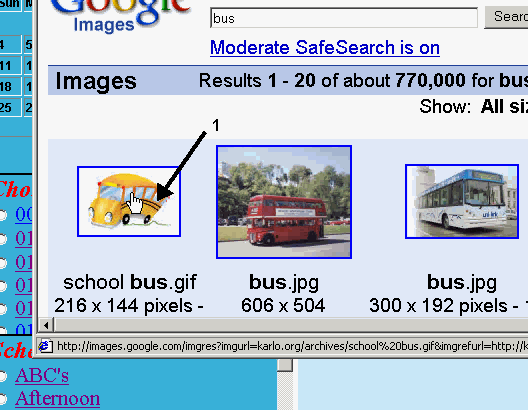
1. A new browser window appears with Google images displayed.
2. Move the cursor onto the picture as shown(1).
Step 3.
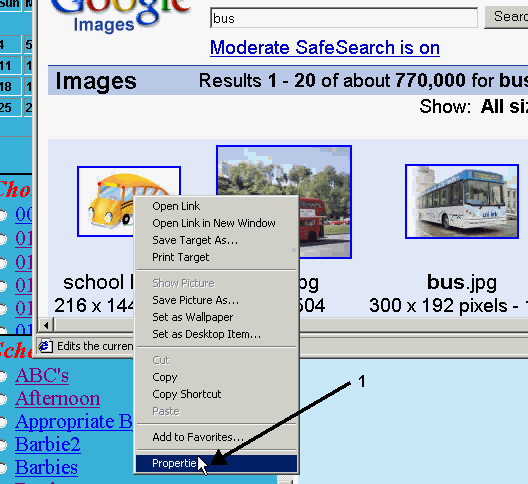
1. Right mouse click, The menu appears.
2. move the mouse down to Properties(1).
Step 4.
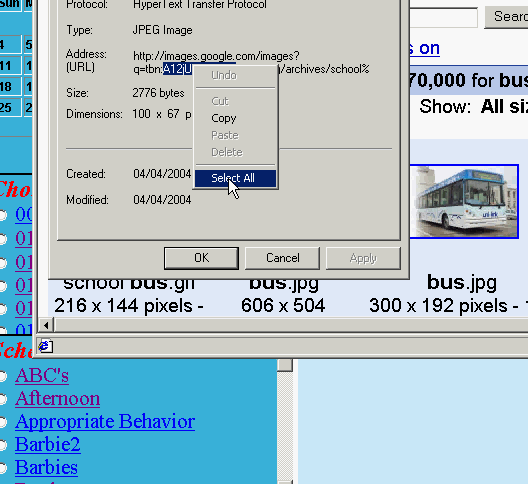
1. The Properties box appears.(1)
2. Highlight the Address:(URL) (2)
3. Right mouse click a menu appears.(3)
4. Move the cursor down to Select All.(3)
Step 5.
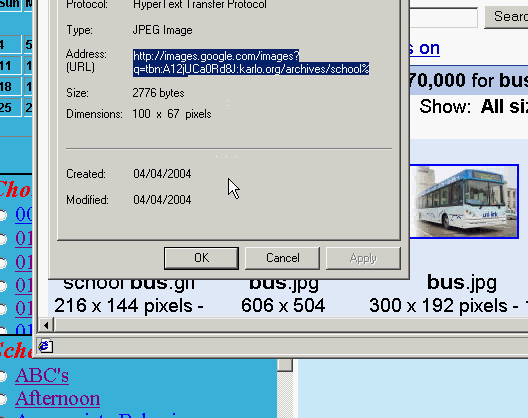
The Properties Box looks like this now.
Step 6.
1. Move the cursor onto the highlighted URL text.
2. Right mouse click a menu appears.(1)
3. Move the cursor down to Copy.(2)
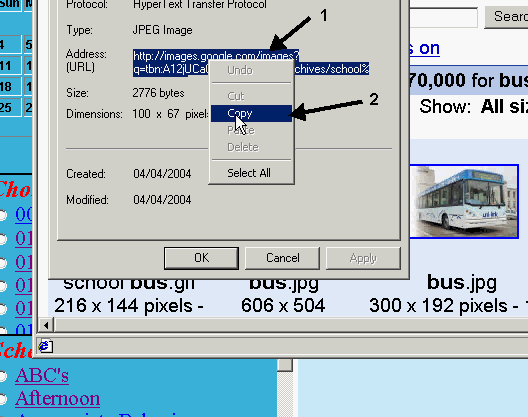
Step 7
1. Now go back to the joeschedule window.
2. Place the cursor in a free edit box in the My Pcitures pane.(1).
3. Right mouse click a menu appears.(2)
4. Move the cursor down to Paste.(2)
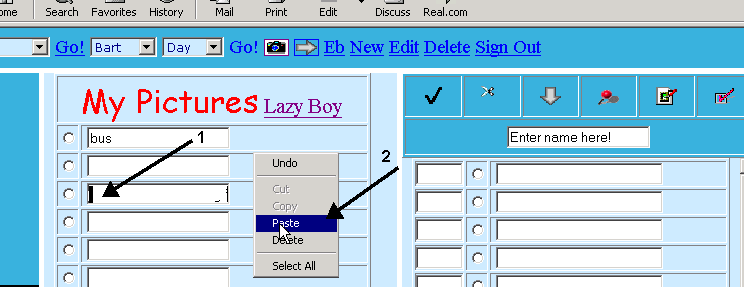
Step 8.
1. Note that the text appears in the edit box(1).
2. Press the Radio button.(2)

Step 9.
1. Note the Bus appears after the Radio button is selected.
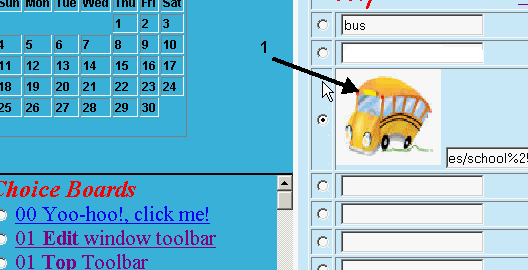
Step 10.
1. Press the Radio button on the Edit side where you want the picture to go(1).
2. Press left-right arrow to move the picture(2).
3. Name your schedule(3).
4. Save it as a schedule(4).
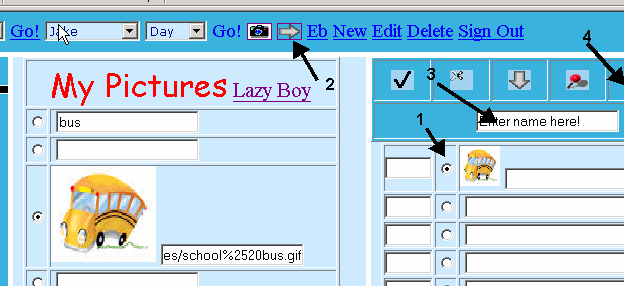
A Word About Pictures
Your own Pictures
When taking your pictures with your digital camera for activity schedules you want to crop out the
unwanted background.
Usually there is a program that comes with your camera that allows you to do this and other image effects.
You can also scan in pictures from childrens books, magazines, your local artist, photos, etc.
I recommend keeping your digital
pictures for joeschedule in one directory and organizing them with joeschedule via choice boards or schedules.
Your Picture CD
If you have Picture CD's I recommend finding the pictures you like from the CD with the CD querying tool,
and copying them to a single directory on your hard disk and managing them with joeschedule like above.
Some places to find pictures
Google Images & Yahoo Images, have many pictures of just about any subject.
EBay - Good site for toys and objects.
Amazon - Book covers and objects
Store sites like the Gap, Shoprite, KMart, toy stores. Good for objects you may find at these stores.
Copying pictures from the Web or Locally uses the same technique.
You move your mouse over the picture and right-click and select properties from the menu. You will see the
Address URL for example file:///G:/fxm/pics/00temp/DSCF0005.JPG if its local or
http://images.vnunet.com/v6_image/ca/pics/25pin.gif if its from the web. Once you copy the url you can put the picture
in one of your schedules.
Picture sizes
There are basically two image types that we're interested in .jpg and .gif.
The .jpg are usaly photos and are larger in size.
The .gif files are usually smaller in size with less detail.
For the purpose of joeschedule you should try to get a picture which is specific in detail with not much background.
Also you should get a picture which is small in size around 20k.
If you can not tell what the picture is by glancing at it, is not a good picture for a schedule. Also if it does not
print well do not use it, if the schedule is to be printed.
Also the larger the size, the longer it can take to download from the internet.
There are fifty-nine aba programs available on the ABA Programs screen. Each program can be customized.
Users create aba sessions from the available programs and those they create themselves. Within each program
users can select what objects they want to teach by flagging them as 'working on'. Objects flagged as working
on will come up each time a trial is run. If no objects are flagged as working on, all objects will be randomly
generated. Any program that has an object flagged with a check mark under w for working on will appear
in the student's Folder under Working on.
You have the flexibility of adding objects to programs you are currently working on if a particular object you want
to teach is not in one of the existing programs. New programs can also be added. Users can make totally new programs
that they create themselves.
To flag an object as Working On
Select ABA Programs
Left mouse click the name of the program you want to edit. Find the object you want to flag as Working On and
left mouse click in the first column to the left of the object. A check mark will appear to indicate that
this object is currently being worked on. Once an item is mastered by the learner, you can mark the object
as mastered by left mouse clicking in the second column to the left of the object under m for mastered.
ABA Session Window
Each aba session consists of one or more programs which can be run.
To run an ABA session
Select ABA Programs. Select one or more programs by left mouse clicking the box in front of each
program you want to run. Select Run Program the main menu. The ABA session window will appear.
The bottom of the screen will display the programs you selected.
To change from program to program simply left mouse click on the program icon you want to run.
Hit the arrow button to go to the next trial. Select 1, 2, or 3 images to be displayed at a time.
Cards - Display or hide the objects
Dealer - Is used for Wh questions and with the Matching Program
1,2,3 - The number of images you want to display at one time
Programs - Display or hide the program icons
Shuffle - Shuffles the objects
WMCards - displays the lists of objects within a program. Shows if an object is flagged as working on or mastered.
An object flagged as working on will continually be displayed as one of the objects in each trial. If more than one object is flagged the objects will randomly rotated.
To run an ABA session from the Folder
Select Run Programs under Working On the first column of the Folder screen.
The ABA session window will open with all of the individual student's programs he is currently
working on displayed across the bottom of the screen.
Adding new objects to existing programs
You have the flexibility of adding objects to programs you are currently working on if a particular
object you want to teach is not in one of the existing programs.
Go to Edit ABA
Select the program you want to edit by clicking on the program's name. The program will appear in the right window for editing.
To add a picture
To add a new object or picture find the picture you want to add by scrolling through
thePictures list or doing a web search for the picture (left most window).
If you don't find a picture you like do a Web Search for the image.
To do a Web Search do the following:
1. Fill in a subject in the Search For: box
2. Hit Web! Search
Pictures that match your search will appear in the middle window.
Moving pictures from the middle to the right.
1. Select a picture by moving the mouse over the desired picture and selecting it.
A black outline goes around the picture.
2. Select a radio button in the edit pane where you want the picture to go.
3. Press left-right arrow to move the picture.
4. The picture appears in the edit pane.
You can also add additional objects to programs from the ABA Programs screen.
To add a picture directly from the ABA Programs screen
Left mouse click the name of the program you want to work on.
A list of all of the objects in the program will appear. Select Add a Card will bring you to the edit window.
Follow the steps to To add a picture.
New programs can also be added.
Users can create totally new programs that they create themselves. Simply create a program the same way you create a schedule. Select an object within the program as Working On and the schedule/program will appear in the list of ABA Programs. For example, if you want a program of different types of dinosaurs create a schedule called Dinosaurs. Add pictures using the Web! Search. Mark at least one of the dinosaurs as Working On and the program Dinosaurs will appear in the ABA programs list, ready to be used.
Communication Board
The online communication board includes the following: I want plus the following verbs: to go, to eat,
to drink, to play, to listen, and to watch.
The learner selects I want from the menu on the bottom of the screen and then selects the appropriate verb to match his request.
If to go is selected, "to go" is added to the sentence strip and the middle of the screen is populated with choices of where "to go". The user then makes his selection and it completes the sentence strip.
Folders
From the students folder you can view his Communication Board, and the entire set of ABA Programs.
The folder also contains the individual programs the student is Working On and the programs he has Mastered.
Working On
View Programs
Displays all of the programs the student is currently working on
At least one object must have the right most box under w checked off as Working On.
Run Programs
The ABA session window will appear. The bottom of the screen will display all of the student's programs. To change from program to program simply left mouse click on the program you want to run. Hit the arrow button to go to the next trial. Select 1, 2, or 3 images to be displayed at a time.
Coming Soon
Mastered
View Mastered
Displays all of the programs the student has mastered.